
Everyone budgets for the tile. What decides whether your shower lasts five years or twenty-five? The membrane underneath it. A failed shower pan doesn’t announce itself. It leaks a little water. Every single day. Into the subfloor, into the wall framing. And by the time you smell it? The repair bill is measured in thousands. Not hundreds.
Most Abbotsford bathroom renovations land in the $12,000–$30,000 range overall. Waterproofing is a small slice of that — typically $1,500–$3,500 of the total when a pro does it as part of a tiled shower. Small slice. Most expensive failure mode in the budget, though. This guide covers what bathroom waterproofing costs in BC in 2026. Sheet membranes. Liquid membranes. Foam pans. Curbless systems. And the mistakes that turn a $200 pail of liquid membrane into a $5,000 subfloor rebuild.
The short version: expect $2–$6 per square foot for waterproofing materials (liquid at the low end, sheet systems at the high end) and $1,500–$3,500 for a contractor to waterproof a standard shower, pan included. Curbless showers run $800–$2,000 more.
1. Bathroom Waterproofing Costs at a Glance
| System | Materials | Best for |
|---|---|---|
| Liquid membrane (RedGard, Mapei AquaDefense) | $2–$4 per sq ft | Tub surrounds, small repairs, DIY-friendly projects |
| Sheet membrane (KERDI-style systems) | $3–$6 per sq ft | Full showers, steam showers, the gold-standard build |
| Foam shower tray/pan (replaces mortar bed) | $200–$300 tray-only; $525–$835 full kit | Walk-in and curbless showers |
| Contractor-installed, full standard shower | $1,500–$3,500 | Pan + walls + labour |
| Curbless shower waterproofing add-on | $800–$2,000 over curbed | Linear drain, floor recessing, extended membrane |
Waterproofing-only numbers, these. No tile. No fixtures, no glass. For the full project math, see our bathroom renovation cost guide for Abbotsford and the tub-to-shower conversion cost breakdown. Waterproofing is usually the line item people underestimate there.
2. Sheet Membranes: The KERDI-Style Systems
Sheet membranes are polyethylene sheets, bonded to cement board or foam panels with thinset. Schluter-KERDI is the one most Fraser Valley tile setters know by sight. Seams get overlapped. Banding strips seal them. Corners get preformed pieces. The result is a continuous waterproof layer — uniform thickness, everywhere. No guesswork about whether a second coat went on thick enough. That is why tile setters who warranty their work tend to prefer them.
The catch? Price. And the learning curve. A full KERDI shower kit for a 48″x48″ shower runs roughly $520–$525 at Canadian tile suppliers. The 38″x60″ off-center kit (the tub-replacement size) sits around $563. A large 48″x72″ kit: $708–$835. Inside the box you get the foam tray. The curb. The membrane roll, banding, drain flange, corner seals — everything except the grate. Genuinely buildable from the manual, for a DIYer. But the material does not forgive. Trap air bubbles under the sheet and they stay. Skimp on thinset coverage at a seam, and that seam is a potential leak.
When sheet membrane wins: any tiled shower you want to last 20+ years. Curbless builds (below). And showers over wood-framed floors — where a leak lands on a finished ceiling below. The material premium over liquid? A few hundred dollars on a typical shower. Small, compared to what a failure costs.
3. Liquid Membranes: The Paint-On Option
Liquid membranes go onto cement board like thick paint. Rolled. Troweled, sometimes. Usually in two coats. The familiar brands in BC: Custom Building Products’ RedGard, and Mapei’s Mapelastic AquaDefense. A 3.78 L pail of RedGard sells for about $103 at Home Depot Canada. It covers roughly 35–40 square feet at the two-coat waterproof thickness the spec sheet requires. (One coat is crack isolation only — not waterproofing. The instructions are explicit about that distinction. It matters.)
That puts liquid membrane materials at roughly $2.50–$3 per square foot. The cheapest per-square-foot waterproofing you can buy. Two pails cover a standard three-wall tub surround for about $200 in materials. No wonder the budget section of every big-box aisle leans liquid. It is also genuinely easier for a careful DIYer. Roller, brush, and patience.
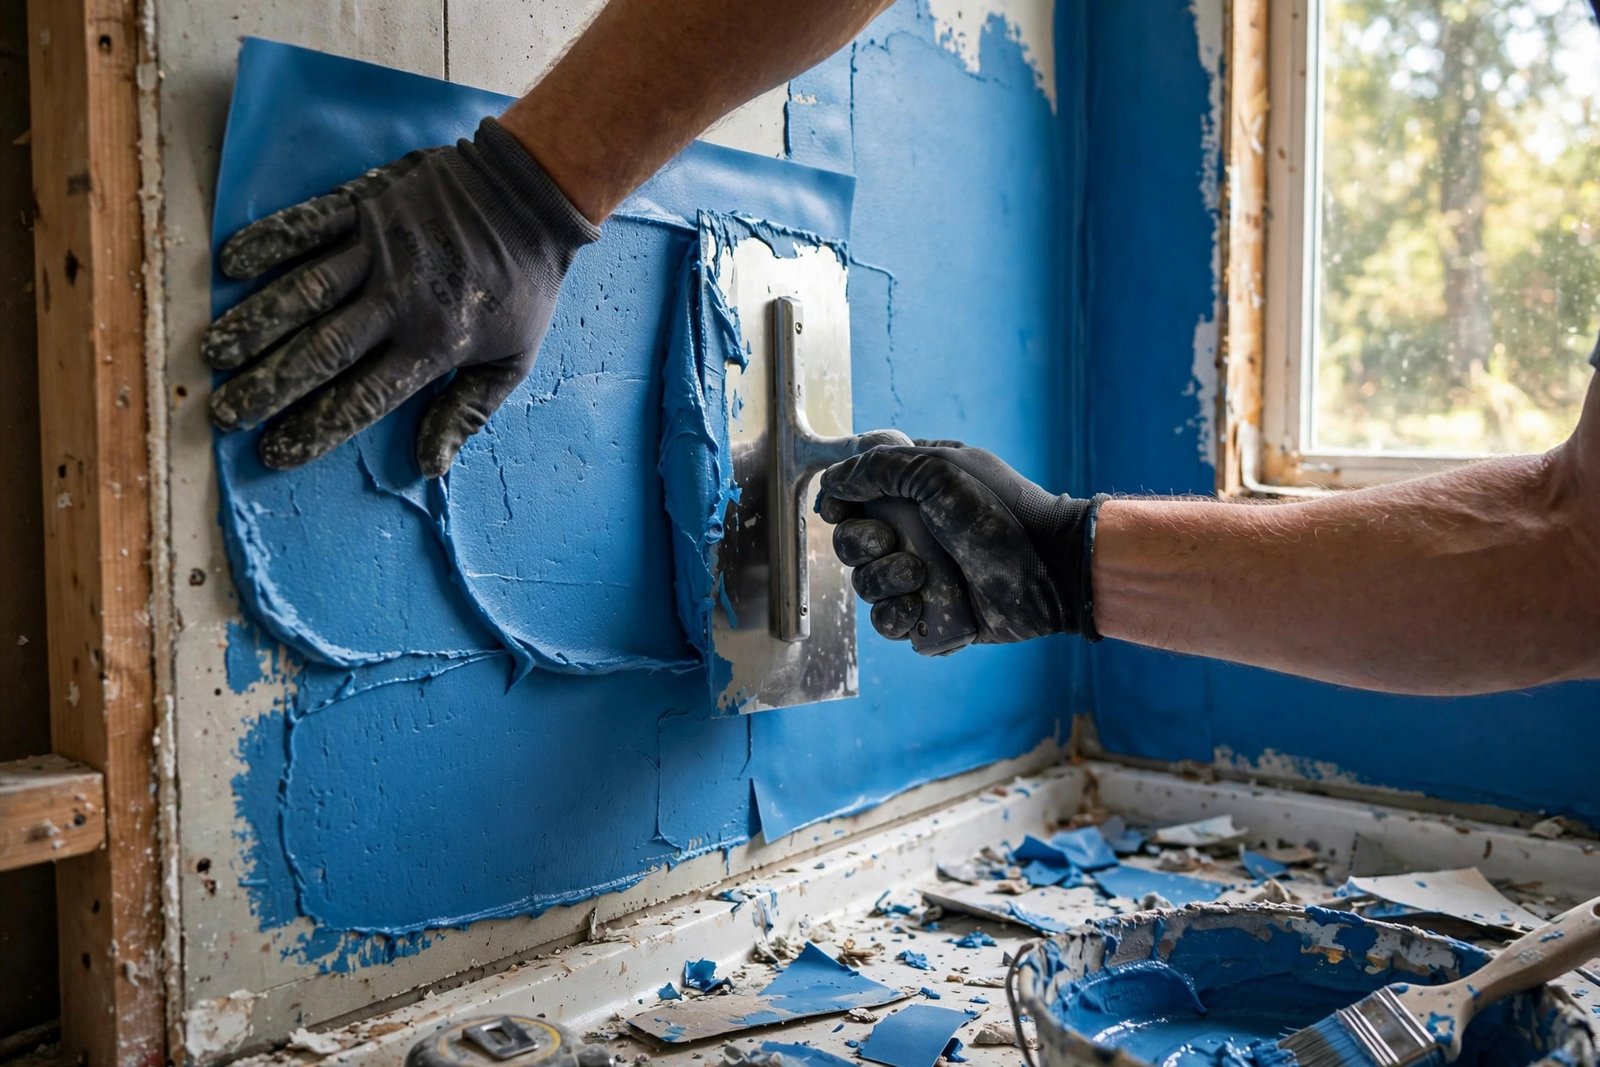
The weakness is consistency. Getting the specified wet-film thickness everywhere takes care. Inside corners. Around the niche. At the mixing valve. And once it is tiled, nobody can see under the membrane. Most pros who use liquid systems apply it over a mortar-bed pan or a foam tray. Never as the pan itself. Then they flood-test before tiling. Go liquid on a shower pan and a flood test is not optional. Plug the drain. Fill to just below the curb or dam. Confirm the water level holds for 24 hours.
When liquid membrane wins: tub surrounds. Vertical walls only, where the risk is low. Small repairs. And tight budgets — where the trade-off is understood going in. On shower floors, most experienced setters reach for sheet. Or a full kit.
4. Foam Pans and the Curbless Premium
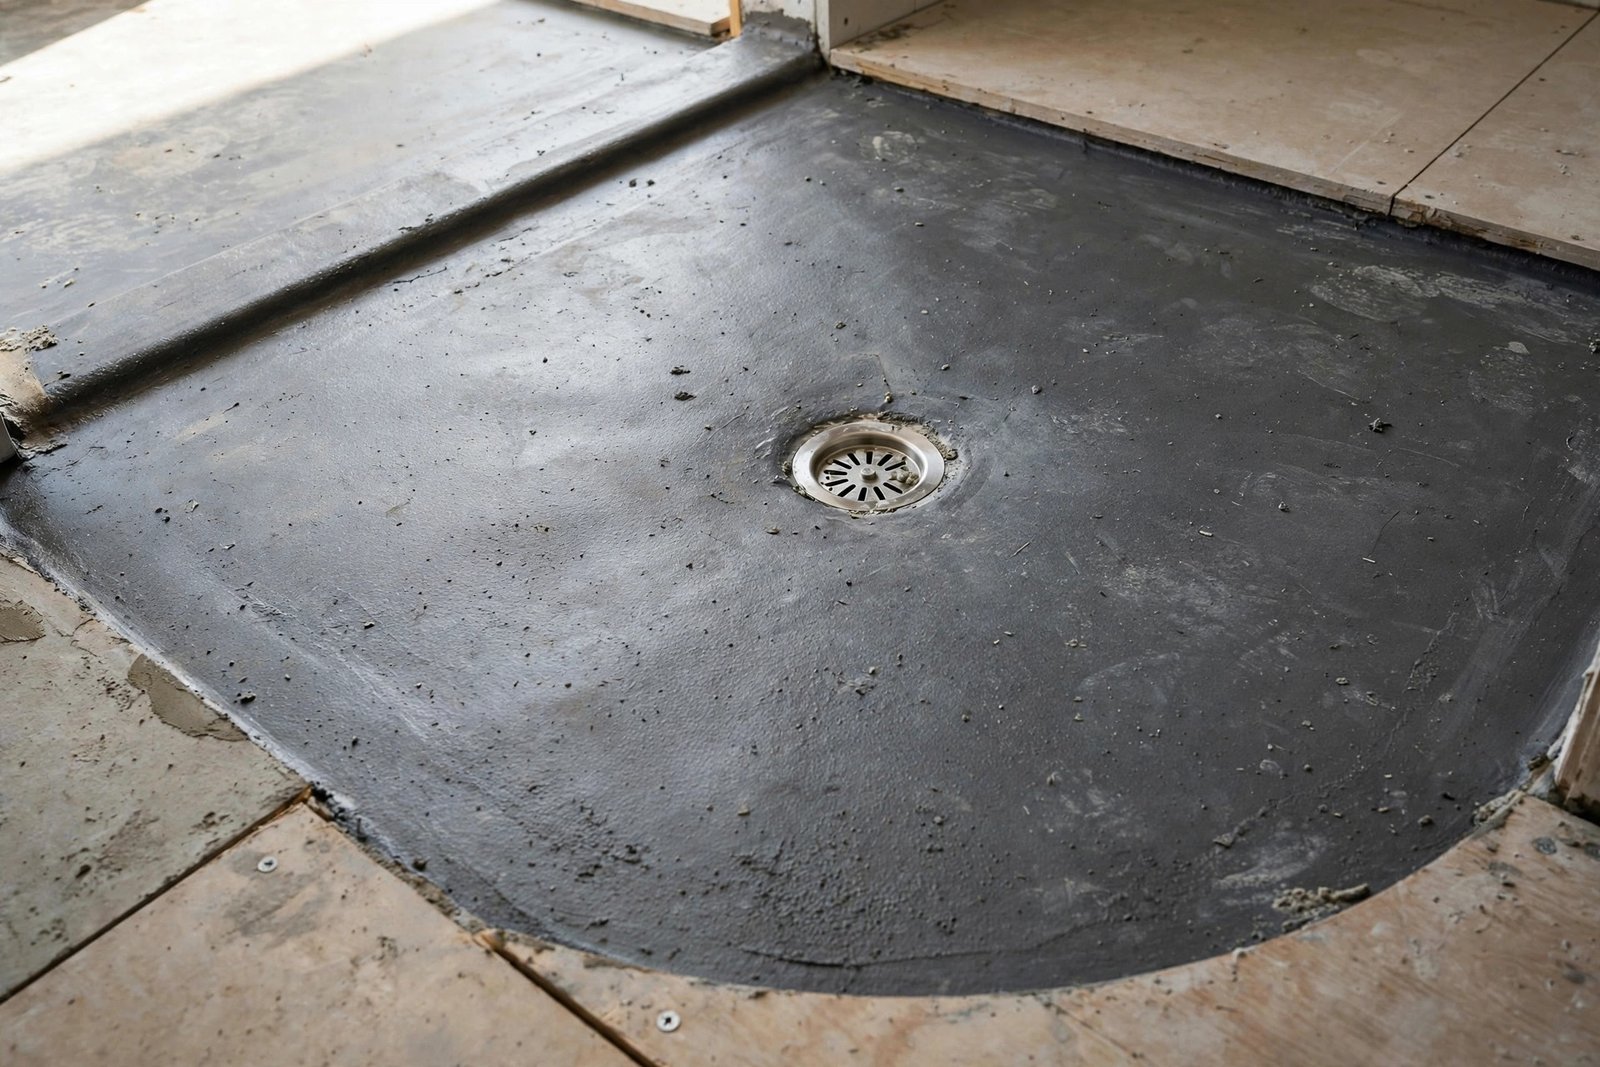
The old way to build a shower floor? A packed mortar bed sloped to the drain. Heavy. Slow. And only as good as the person mixing the mud. Foam pans (KERDI-SHOWER trays and equivalents) replace that with a pre-sloped tray. Waterproof expanded polystyrene. A tray alone runs roughly $214–$270 for common sizes; it shows up inside the full kits priced above.
Curbless showers are the fastest-growing ask in Fraser Valley bathroom renos. Zero threshold. Tile running straight from the bathroom floor into the shower. The waterproofing is what makes them expensive. A curbless build typically needs:
- A linear drain or recessed tray — the whole bathroom floor slopes gently toward it. Not just the shower footprint.
- Floor recessing or ramping — on a wood-framed floor, the subfloor gets notched. Or the surrounding floor ramps up to meet it. On a slab, the concrete gets cut down.
- Extended membrane coverage — waterproofing runs well past the shower area. Often across the entire wet-zone floor.
That is why curbless waterproofing adds $800–$2,000 over a curbed shower. It is also why the full tub-to-shower conversion numbers climb when the curb disappears. The tile and glass get the compliments. What you actually paid for? The drain layout. The membrane.
5. What Contractors Charge: The Labour Side
Waterproofing labour in BC mostly hides inside the tile setter’s or bathroom contractor’s quote rather than appearing as its own line. Broken out on its own, the installed rate for membrane application in small wet areas lands around $8–$15 per square foot. High per-foot numbers. But shower walls and pans are small areas, so the totals stay manageable.
Here is a realistic contractor-installed waterproofing bill for a standard 3’x5′ tiled shower. Membrane materials ($300–$600). Foam pan or mortar bed ($200–$500). Drain assembly ($100–$300). Then labour for prep, membrane, pan, and flood test — landing at $1,500–$3,500 total. Walk-in and curbless showers land at $2,500–$5,000. These ranges assume the cement board is already up. The plumbing rough-in is done, too. Demolition, board installation, and tile are separate lines in your bathroom renovation timeline and budget.
One honest note. A quote that lumps “waterproofing included” into the tile price — without naming the system — deserves a follow-up question. Ask it: “What membrane are you using, and do you flood-test?” Ten seconds to ask. The answer tells you whether you are buying a system. Or a hope.
6. Where DIY Waterproofing Goes Wrong
Waterproofing is the one bathroom trade where failure stays invisible. Until it is catastrophic. The mistakes that show up in Fraser Valley repair calls, year after year:
- Tile and grout treated as waterproof. They are not. Grout absorbs water. Tile is just a wearing surface. Water moves through both — and it has to meet a membrane behind them. Skip the membrane because “the tile guy said the grout is sealed” and you have picked the single most common cause of shower failures.
- One coat of liquid instead of two. At crack-isolation thickness, liquid membrane is not a shower pan. Follow the coverage math on the pail, not your arm’s reach.
- No flood test. Fill the pan. Mark the level. Wait 24 hours. It costs nothing. It catches the failures that matter. Skip it, and the first flood test happens when your downstairs ceiling stains.
- Drywall behind the membrane. Moisture-resistant (“green”) drywall is not a tile backer in a wet area. The substrate is cement board. Or foam board. That is what the membrane bonds to. Membrane over drywall fails when the paper facing behind it gets wet. And it will get wet.
- Penetrations sealed last, or never. Where do leaks start? The mixing valve. The shower arm. The niche corners. Sheet systems have preformed seals for these spots. Liquid needs reinforcing fabric there, plus full coverage. Corners first. Field second.
- The wrong product for steam. A steam shower needs a vapour-tight assembly (sheet systems are rated for this; most liquid-only builds are not). If steam is in the plan, say so before the membrane goes up.
None of this takes DIY waterproofing off the table. A careful homeowner can build a good shower — full sheet-membrane kit, the installation manual, and a flood test. What it means is this: waterproofing is the wrong place to improvise. Or swap products mid-job. Or skip steps to save a day.
Frequently Asked Questions
How much does it cost to waterproof a shower in BC?
Plan on $1,500–$3,500 for a contractor to waterproof a standard tiled shower — pan, walls, drain, and flood test included. DIY materials run $300–$800 for the same shower. Depends on the system. Liquid membrane at the low end. A full sheet-membrane kit at the high end. Curbless showers add $800–$2,000. These are 2026 BC planning ranges. Tile, glass, and fixtures are separate.
Is Schluter-KERDI worth the extra cost over liquid membrane?
For a shower you want to last 20+ years, yes. A full KERDI kit costs $525–$835, depending on shower size — a few hundred more than liquid membrane materials. What does the extra remove? The two biggest DIY and budget-pro failure points. Thin spots. Bad corners. Uniform sheet thickness, preformed corners, and a foam pan take both off the table. Liquid membrane is still a fair choice for tub surrounds and tight budgets. Two full coats. Flood-tested.
How much does waterproofing membrane cost per square foot?
Materials run $2–$6 per square foot — roughly $2.50–$3 for liquid membrane (two coats) and $3–$6 for sheet membrane systems. Installed by a contractor in a small wet area, the all-in rate is typically $8–$15 per square foot. Shower areas are small, though. So the total is usually measured per shower. Not per foot.
Do I need to waterproof behind a bathtub surround?
Yes — the walls behind a tub or shower surround need waterproofing, even if the floor already has some. Water runs down walls. It wicks into drywall. Behind acrylic surrounds it feeds mold — for years, before anyone notices. The standard is two coats of liquid membrane or sheet membrane over cement board. Cheap insurance on a wall you will never see again once the surround goes up.
Can I waterproof a shower myself?
Yes, with a full system and a flood test. Sheet-membrane kits are the most DIY-friendly. Why? The manual specifies every piece, and the flood test verifies your work. Liquid membrane is the reverse. Simpler to apply, harder to verify — thickness is invisible. What you should not do is improvise. No mixing brands across the pan and walls. No skipping the flood test. No tiling over drywall in a wet area.
What is the difference between bathroom waterproofing and basement waterproofing?
Bathroom waterproofing keeps shower and tub water out of your walls and floors. Basement waterproofing keeps groundwater out of your foundation. Different products. Different trades. Different problems, entirely. Our basement waterproofing guide covers the foundation side — drainage, sump pumps, and exterior membranes.
The Membrane Is the Shower
Tile is what you look at. The membrane is what you live with. On a $20,000 bathroom renovation, the gap between the cheapest waterproofing and the best system? A few hundred dollars in materials. One extra day. Set that against a failure that costs ten times that to fix. Buy the system. Follow the manual. Flood-test the pan. And ask your contractor to name the membrane before the first trowel touches the wall.
Product prices vary by retailer and shower size — confirm current pricing before budgeting.
For the bigger picture, our bathroom renovation in Abbotsford page covers complete bathroom projects, from layout changes and walk-in showers to full gut-and-rebuild work across the Fraser Valley.